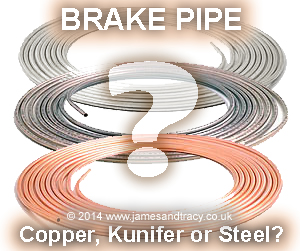
 Replacing brake pipes is easy, but it can be a costly business if you don't do it yourself. For example a Mercedes dealer will charge you up to £1200 to replace your rear brake pipes or lines, and an independent garage will charge you up to £450 for the same job. However, even if you have to buy all the special tools and equipment you can do the same job for less than £60. If you already have the special tools then the same job will cost you about £25 and 4-6 hours of work.
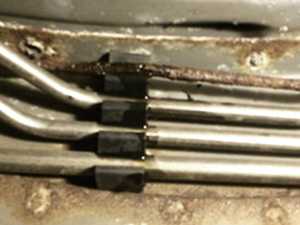
 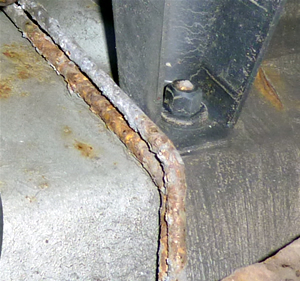 If your brake pipes look like the photo then you probably need to replace them. However, recently my car failed the MOT due to rusty brake pipes and brake hose ferrules. This was a surprise for two reasons; (1) There had been no advisory on last year's MOT and (2) I had only just bought the car and had thoroughly checked it over only a few months previously. However, the golden rule is never to question the "MOT man" (especially as I know him so well) - so there was nothing for it but to rip out the brake lines and replace everything. Once I'd got the old brake pipes out I cleaned them up to properly inspect them. As expected they were perfectly sound, just the plastic film cracking and some surface rust with some light pitting. So if you're in the same situation as me with a failed MOT, before you go ahead and replace the brake pipes try cleaning them up in situ - check them carefully, but they could be fine. A wire brush and some Waxoyl may be all you need to do.
 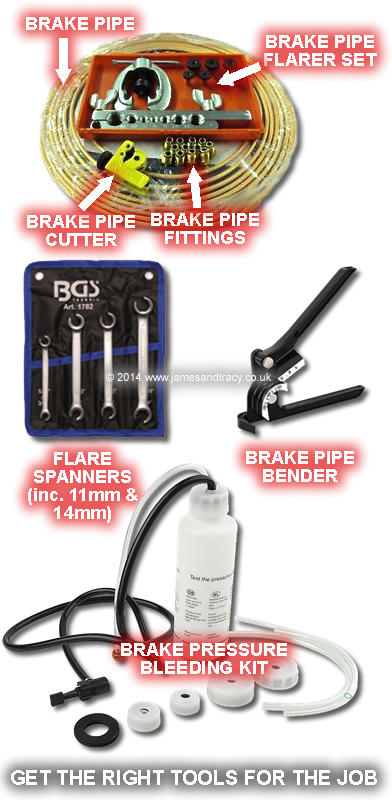 Getting the right result without spending hours or skinning your knuckles is all about having the right stuff handy. What you need for this job is:
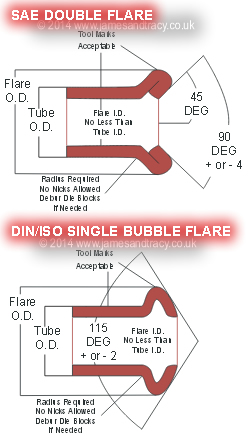 (except some 'classic' Land Rovers and Jaguars). SAE flares tend to only be used on American cars, but slowly even these are being standardised on the improved DIN fitment. Metric and imperial flares are interchangeable with metric or imperial brake pipes, for example you can safely use a metric flare on an imperial brake pipe. What matters is that you use the correct flare for your fitment, luckily this is easy as you cannot fail to tell these two types of flare apart. The metric Din looks like a bubble, but the imperial SAE looks like a cocktail glass (see photo to left). When you remove your old brake pipes have a look at the flare on the end of them (it'll almost certainly be DIN) and only use that type of flare. On the Mercedes the flare was as expected a DIN/ISO single bubble on a 4.75mm standard brake pipe, as a result the (even more) standard 3/16 inch (or 4.7625mm!) imperial brake pipe can be used as a replacement (which is of course why 4.75mm was chosen as the standard metric pipe diameter to allow them to be interchangeable!). As an aside, imperial SAE and DIN metric flares will seal well against each other if you are using copper brake pipe, and this is the technique used to create the "Brake Pipe End Caps" in the next section. However, do not mix and match like this for any part that is going to be left on the car permanently. Almost all brake flaring tools (brake flarers) will do SAE and DIN, but you need to make sure that you have one or buy one that covers both these standards. While all brake flaring tools will work with "pure" copper pipe, only the expensive tools tend to work with kunifer copper pipes. If you are going to replace your brake pipes with kunifer, make sure your flarer specifically mentions that it works with this material as it is much harder. Tools that work with kunifer tend to be around £100, while those that only work with copper are much cheaper at about £15.
 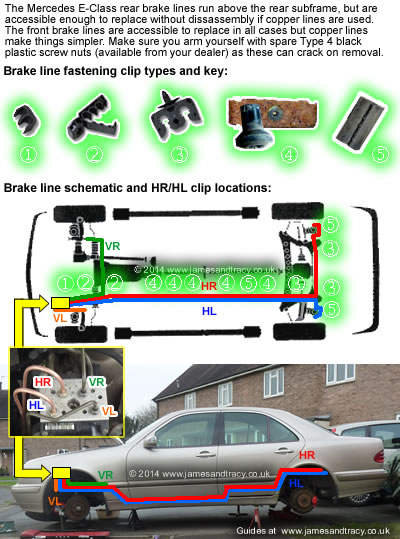 Familiarise yourself with the route of the brake pipe you are going to replace (see photo to the left). The photo also shows the locations of the rear brake line pipe-to-body fixings. The front fixings are not shown as these can easily be seen from above. If you are replacing rear brake pipes I would strongly recommend that you have some spare Type 4 black screw nuts shown in the photo as these often break on removal - they are available very cheaply from your dealer. I would also recommend that you buy some 8mm black rubber petrol hose as this can be cut up and slit to make spare Type 5 fixings. Working on brakes is potentially dangerous both during and after the repair - always use the triple check rule: (1) check the work you've done in situ (2) road test and then check the work you've done (3) finally re-check the work you've done after driving 50 miles. The triple check rule particularly applies to bolts if you have removed any calipers. Garages and dealers can't use the triple check rule, they can only double check, which is one good reason I always work on brakes myself and I've never let them (or anyone else) near the braking systems on any of my cars.
 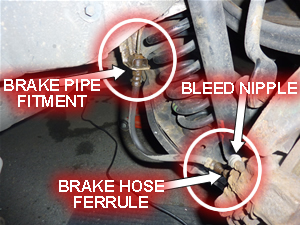 First locate the rear fitment of the brake pipe you will be replacing - this is where the brake pipe terminates in a fitting with the rubber brake hose that goes into your brake caliper. It ill be found under the wheel arch on the side of the wall (see photo to right). These fitments are notorious for welding themselves together - this is where the penetrating oil (WD40 or similar) and flare spanners come in. For the moment just spray it with penetrating oil and leave it alone to work in. If you're replacing the brake hose as well then spray the brake hose ferrule at the caliper, but be careful to prevent any oil getting on your brake pads. While you're about it also spray the bleed nipple on the caliper with penetrating oil.
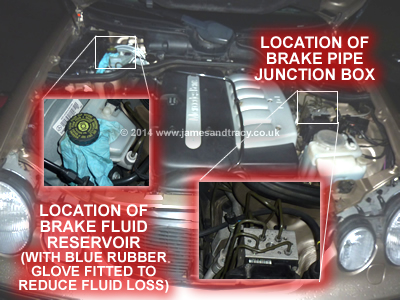 Have a look at the photo to the left and familiarise yourself with the location of the brake fluid reservoir and junction box. The brake pipes on junction box are labeled (HR, VR, HL, VL) see the photo at the start of this section for how these relate to the brake pipes. Starting at the front of the car, lift the bonnet, unscrew the brake fluid reservoir cap and place a rubber glove over it before screwing it back down to form an air tight seal. This will reduce fluid loss when you unscrew the brake pipe fittings.
 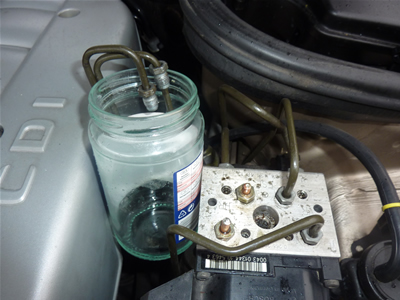 Now get your brake pipe end caps (see here for how to make them), old rags and a jam jar handy. Using a flare spanner (do not use a standard spanner or you may round off the nut), unscrew the brake pipe you will be removing from the junction box. Place the brake pipe ends into the jam jar to catch any fluid and seal the hole in the junction box with a male brake pipe end cap. Finally seal the end of the brake pipe with a female brake pipe end cap and make sure you clean up any spilt brake fluid with rags immediately as it is very corrosive.
  Next if you are working on the rear pipes, you need to get under the car and remove the rear section of the underguard tray beneath the engine/transmission (see photo to left). The Mercedes E-Class has 3 trays in total that work together like the shell of an armadillo. The front and middle trays can be left in place, although it is easier if they are removed too (especially if you drop something from the top of the engine!). The trays all unbolt from the chassis in the following order: back, then middle, then front tray. With the tray removed you should be able to see all the brake pipe to body fixings and gain access to them.OK, take another look at the brake pipe routing schematic in the photo on the right. Note the position of the types of boy fixings and, if you are replacing a rear brake, note the position of the fixings shown in the photo. Some fixings are of the simple clip type and can be sprung simply by pulling the brake pipe away from the fixing (Type 1 and 3), some have to be levered open before the brake pipes can be sprung lose (Type 2), some can be removed after you have the brake pipe out (Type 5) and some on the rear pipes are held in by a screw bolt fixing (Type 4). Locate all these fixings and release the brake pipe from them along its length. Work methodically from front to back and be very sure every one that needs to be opened is found and the brake pipe released from it.
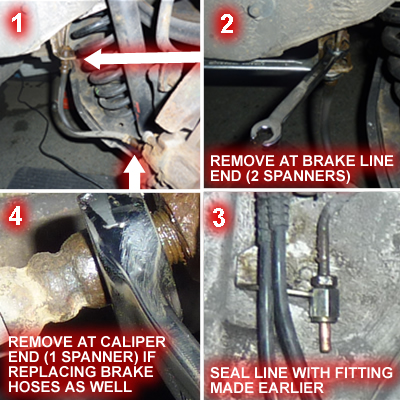 . Also make sure you have a male and female brake pipe end cap handy to seal the brake hose and pipe once it is removed. Always use a flare spanner for undoing the fitments at the brake pipe end of the fitting, as they will be very tight and an ordinary spanner is likely to round off the nut making it impossible to remove without grinding it out. Support the brake hose end of the fitment with an ordinary spanner to stop it rotating, there is a flat cut into the cylindrical steel ferrule of the brake hose for you to do this (see photo to left). Now undo the brake pipe from the brake hose and then seal both with brake pipe end caps. Congratulations your brake pipe is now ready to be removed
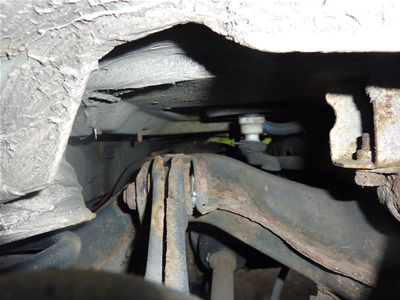 Removing a rear brake pipe needs to be planned. On right hand drive cars the near-side is easier to remove than the off-side (driver's side), but neither is truly difficult to remove as a single item if planned. There is enough clearance to get the brake pipe above the subframe (see photo to right) and the old pipes will bend quite a large amount without breaking. The order you should plan to remove them is as follows:
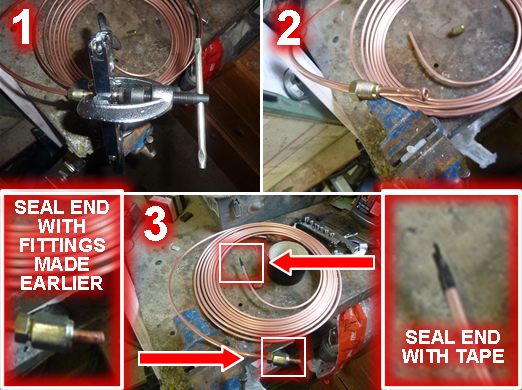 Whether you pre-bend or not, the first step is to always seal the new pipe so that dirt will not get into it while you fit it. The easiest way to do this is to place the fitment and flare the end of one end in the brake pipe (ready to be attached to the car), but to leave the other end un-flared and sealed with tape. This allows you to thread the brake pipe into place and then bend it, without having to worry about getting it exactly the right length. Personally I leave my brake pipe rolled, fabricate the fitment, add a brake pipe end cap to seal it then seal the pipe end with tape. I then unroll it as I fit it. Once fitted you can then cut the other end, flare it and be sure of an exact fit. See the photo to the left for what I mean. If you are fitting two brake pipes at the same time, a good tip is to use different colour tapes to seal them so you can identify which is which.
 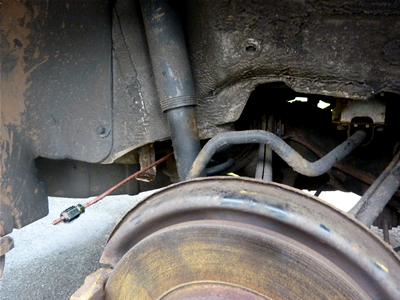 Fitting a front brake pipe will not cause you any difficulty so I will not waste time explaining it. However, if you are replacing rear brake lines then you do need to follow a procedure. Start at the front of the car above the engine and slowly unwind and thread the brake pipe down through the engine bay fitment end first (not taped up end first!). Don't bend it yet, keep it straight, but be careful to follow the path of the original brake line (don't get it the wrong side of any water pipes etc.). Keep feeding it through under the car until the end reaches the ground beneath the rear subframe. At this point, don't feed any more pipe through, but step back from the engine and straighten the rest of the pipe out in front of the car
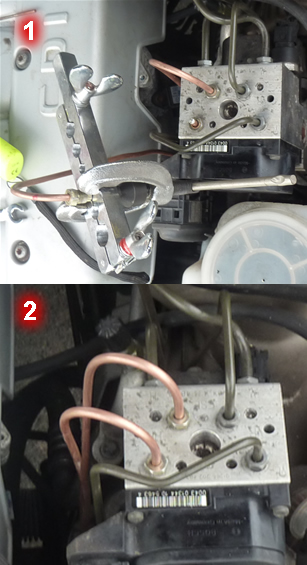 . Now working under the car at the rear you should be able to pull the pipe through and feed it up over the subframe, following the path of the original brake line and threading it around obstacles until it pops out under the rear wheel arch. Feed through a bit more than you need, so you have space to bend it to attach to the brake hose (see photo to right).
 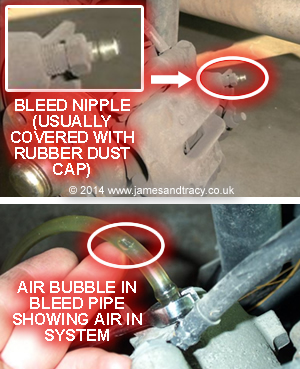 Bleeding the brakes removes all the air from the system. If any air bubbles are left in the brake lines your brakes will not work properly and will feel spongy when you press the brake pedal. Bleeding is a simple procedure that involves forcing brake fluid through the system from front to back while you open and close every bleed nipple (remove their rubber dust covers first!) on each caliper in sequence to let the air get pushed out (see photo to left). The sequence for bleeding always starts with the longest brake pipe run and works to the shortest. This sequence ensures air bubbles do not get trapped in the lines. You can use the old method of pressing the brake pedal to force fluid through, while there is a one-way valve placed over the bleed nipple to stop air being sucked back up into the lines. However, you do risk scoring your brake master cylinder using this method by forcing down further than it would normally go into old dirty deposits. If you score it, it may leak and you will need a replacement (expensive!). I would therefore recommend using a pressure bleeding system like Gunson Easee-Bleed, they're cheap, effective and far more easy to use.
 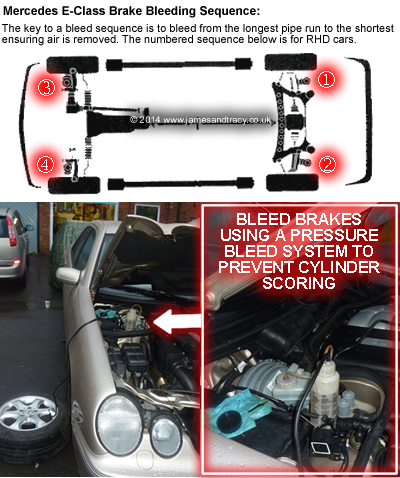 You need to bleed the pipes in sequence as shown in the photo to the right. If you are also flushing the brake system with new fluid, you will find that new fluid is paler and clearer than old fluid so you should be able to tell as soon as the new fluid starts to come through. There are special colourants you can put in brake fluid to help you tell when you have flushed the system, but they are expensive and not really required. Anyway, connect up your brake bleeding kit and have a jam jar and some rags handy. Work your way around the car, bleeding each brake in sequence by opening the nipple, letting fluid flow out and then closing it before moving on to the next wheel. Continue bleeding a nipple until you cannot see any bubbles being expelled from it. If you're flushing the system then continue until you start to see the new fluid flow out of the nipple and down the pipe. Once you have completed the sequence, carefully depress the brake pedal in the car 5 or 6 times, then go back around and bleed each brake nipple again in sequence. If no more air bubbles are expelled, then you have completed the brake bleeding operation.
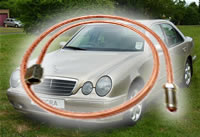
PLEASE SUPPORT US |
| If we helped save you money, please pay the favour forward and help support the upkeep of this site and its guides for others. Just click a button below. |
 |
 |
 |
| Big thanks from us for your help! |
Please share your knowledge. |
| Many people have already helped others through this site by contributing information and techniques. If you have something you want to contribute, please click here to contact us. You'll be credited on this site and you'll have shared what you know to help the community. |
| Thanks to all who have contributed |


 It is only your donations that keep this website going. If we've helped you, please pay the favour forward and help others by keeping this content alive. You can do this by clicking here and donating. Thank you, for whatever you decide to give.