


 Replacing brake discs (or rotors) and pads is a very easy job and it's hard to screw it up if you follow the correct procedure. These are big hulking pieces of metal that are specifically designed to be replaced regularly and to only fit on one way so you can't mess up your brakes. This all makes the job easy and suited to a beginner if they follow the workshop instructions and take every required precaution. For this reason, in professional garages this sort of job is often given to trainees and then once finished is checked by an experienced technician.
  Hands down use OEM for your brake discs and pads, but you'll need to do the research to find the right manufacturer so you can be sure they are the true OEM supplier of the original equipment to Mercedes or whoever. There's a lot of misinformation on the internet about OEM discs warping, failing etc. etc. but I have never run into a case of quality OEM disc failure that was clearly down to a manufacturing fault, they've always been down to either fitment errors, sticking calipers or improper break in. The most usual cause is a fitment error, almost always where the hub spider's face has not been cleaned properly... that's trainees working to a strict fitment time for you! The other thing I think that happens is that people buy cheap, poor quality aftermarket parts that are not from the OEM supplier. This is because a lot of people are confused about what OEM actually means (i.e. its the original supplier of the parts to the car manufacturer, not any old aftermarket part!) So apart from the massive price increase, take it from me that there's nothing more 'genuine' about dealer parts when compared to the true OEM supplier's parts - they are the same ones!
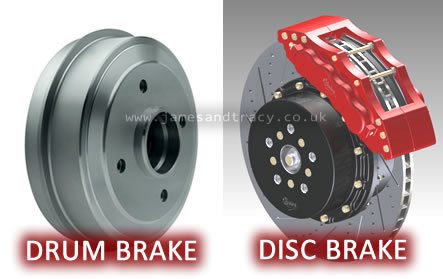 There are two common braking systems found in cars - Disc Brakes and Drum Brakes. Most modern cars use disc brakes as they have some significant advantages over drum brakes. This guide is about disc brakes which look totally different to drum brakes (see photo). You will find drum brakes on some modern cars where they are used only for the handbrake (or parking brake) - Mercedes and BMW both do this. This is why, if you pull off the rear brake disc of a Mercedes, you will find inside the disc that you have a drum brake as well as your rear disc brakes!
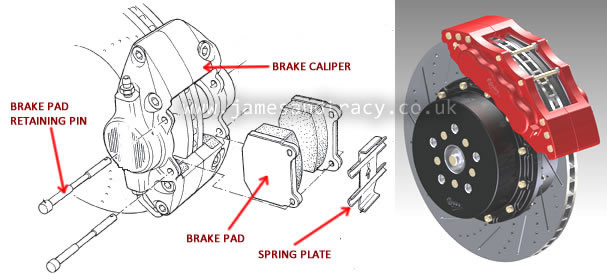 As the brake disc is connected to your wheels this slows (or stops) the car. For most newer cars the front brakes have brake pads that are held inside the brake caliper by two retaining pins and a spring plate (see diagram). The pistons inside the caliper slide out and squeeze the brake pads against the brake disc. As this happens the brake pads slide up and down these pins and brake vibrations are stopped by the spring plate. Rear brakes are usually of very slightly different design, but this is not always the case.
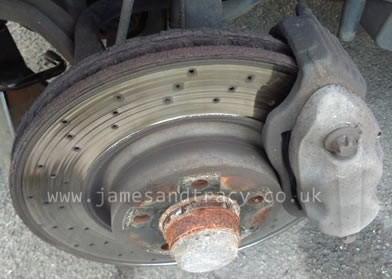
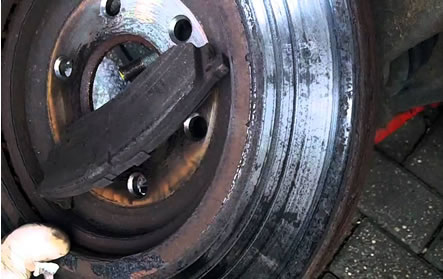 If your brake discs look like the photo then you probably need to replace them as they are deeply scored. If you have vent holes drilled in your discs you will get a wavy wear pattern - this is normal. The wavy ridges are down to uneven wear caused by the vented holes in the disc and should not be present on unvented discs. If your discs have a large lip around the edge or serious scoring or a crack then you need to replace them. All discs have the minimum thickness stamped on them and there is additionally a marker for minimum thickness. This visual wear marker is usually a machined flat, cut or hole. When the discs wear down to this marker it shows up visually as an obvious 'bite' out of the disc, or as a hole in the face of the disc, or as a flat in the round circumference of the disc (think how a flat tyre looks and you'll get the idea). If discs reach their minimum thickness they must be replaced. Also, if you are experiencing judder when you brake you may have warped discs and they must be replaced.
  Worn brake pads are easier to diagnose by anyone. Sometimes (but not always) if your pads get worn low and you will have a wear indicator pop up in the dash (a message or warning light). However, sensors are usually only put on one pad on one side of the car, and not all cars have wear sensors. So I'd recommend a recommend a simple twice yearly visual inspection as well. This will help you catch a sticking caliper issue early. With a sticking caliper your brakes could wear very quickly on one (and only one) pad - it will then be a 1 in 4 chance that this pad is the same one with the brake wear sensor. In this case, you might never be warned by a light on the dash before you run out of brake material.....it's happened to me! So inspect your pads regularly, even if you have wear sensors. If when you look at the pads there is less than 3mm on the face material of the brake pad left, then you need to replace them. However, I'd recommend you replace them anytime after there is about 5mm of wear left just to be on the safe side.
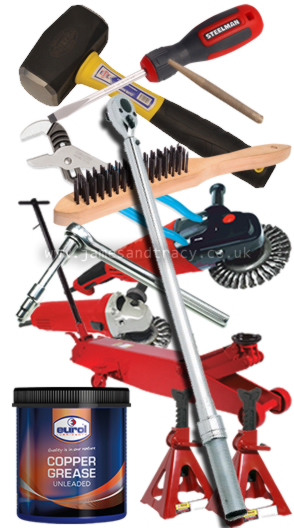 Getting the right result without spending hours or skinning your knuckles is all about having the right stuff handy. What you need for this job is:
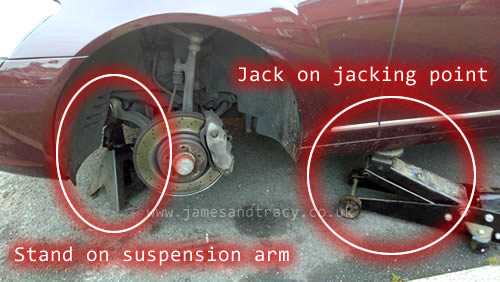 Before you jack up the car make sure the handbrake is on, it's in Park (or chocked) and loosen the wheel nuts a little on the wheel you are going to remove. Then jack the car up, support it and take the wheel off. You may find it easier to take both front wheels off the ground, if that is the case ensure you use good chocks and support the car properly. Click here for a guide that tells you how to safely jack up and support your Mercedes with either 2 or 4 wheels off the ground.
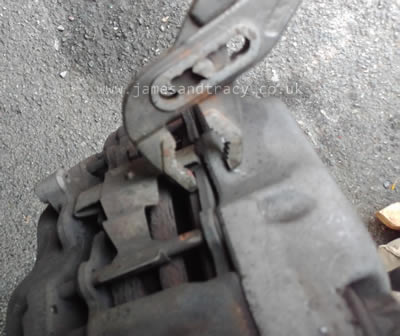
 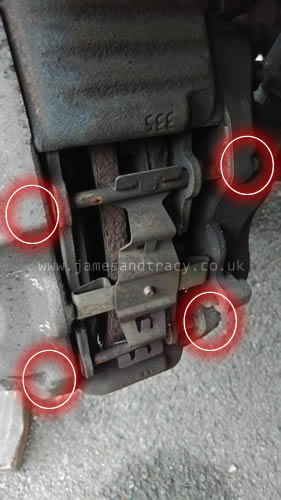 Sometimes brake retaining pins get stuck and you can make the whole job a lot easier by wire brushing the ends where the pins enter the calipers and applying some penetrating oil (e.g. WD40) an hour or so in advance of trying to remove them (see photo). Normally you'd have to be very careful about getting any oil on your discs or brake pads, but if you're replacing them then you don't have to worry! However, I'd be careful anyway and ensure that your penetrating oil does not get on the pads or discs.
 Grab the water pump pliers as these are by far the easiest tool to use (however, if you only have a flat head screwdriver, grab that!). For water pump pliers you can retract the brake pads by gripping the caliper with one side of the jaw and using the other side to grip the metal lip of the brake pad (see photo). If you only have a screwdriver, rather than water pump pliers, then you can stick that into the small gap between the pad and the disc and use it to lever the pad back away from the disc. Repeat for both brake pads - outside and inside of the caliper - until they are fully back and away from the disc. It is best to apply continuous pressure as the pads will only move very slowly backwards. You may also find that pressing one brake pad back, forces the other one forwards - if this is the case simply use a spare screwdriver in the middle of the other pad to keep it in place while you lever the pad you're working on backwards.
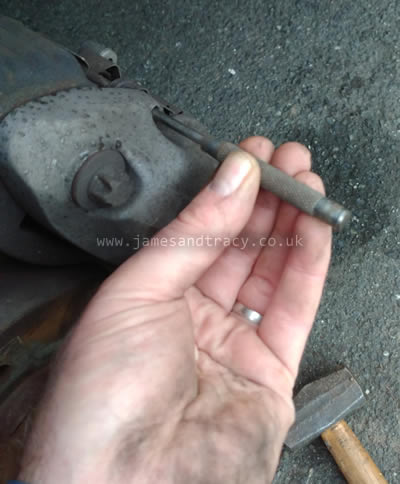 have never resorted to cutting or drilling them out. If you follow the steps below then neither will you, but it can take a lot of force! You will need a proper stout 4-5mm drift (not a long and thin one, nor a nail or whatever) and you will need a heavy lump hammer, not an ordinary hammer. The pins in my S Class were the worst I'd ever come across and believe it or not, for the first time on a car I used a 20lb sledgehammer (very, very carefully while holding the 'head' in one hand!) and even shattered my first drift! This is very unusual and you will not need to do this, but you must have a heavy lump hammer and a good drift.
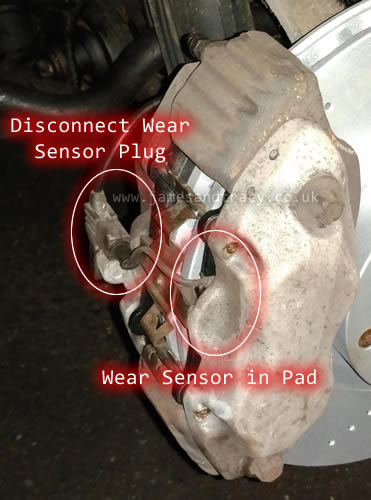 nce the pins have started to move, you can fairly easily knock them back and out of the caliper. Once they are out the spring plate will drop to the floor. Clean both caliper retaining pins and the spring plate- you can buy spares, but you may as well reuse the old ones. Make sure you have got every bit of corrosion and dirt off the pins as you don't want them sticking again after all that work!
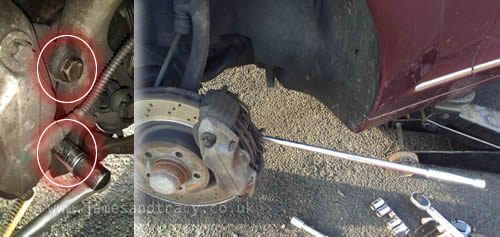 It is now time to remove the brake caliper from the brake rotor. This is easy but will require a breaker bar or a long torque wrench. Have some strong string or rope handy as you'll need to hang up your caliper once it is off. If your brake pads are still in the caliper because your caliper piston was sticking, once the caliper is removed they will be simple to extract.
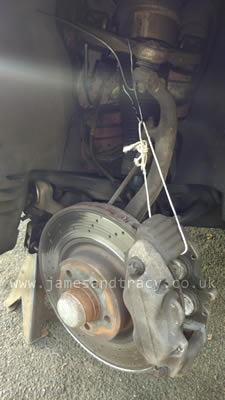 You should carefully rotate the steering wheel at this point to it's maximum lock so that the caliper is out of the wheel arch as far as is possible - this will dramatically increase the ease with which you can work on it. Clean the two caliper bolts up and use a little penetrating oil before attempting to undo them. Undoing them is easy, do not believe those stories on the internet that tell you that 'the Mercedes S Class W221 can't be lifted high enough to get a breaker bar on there' - it's simply not true (again see photo where I'm using a 3 foot breaker bar). Be careful as you undo the last of the two bolts as the caliper will fall off the wheel when it is out - so hold the caliper with one hand as you remove the last bolt.
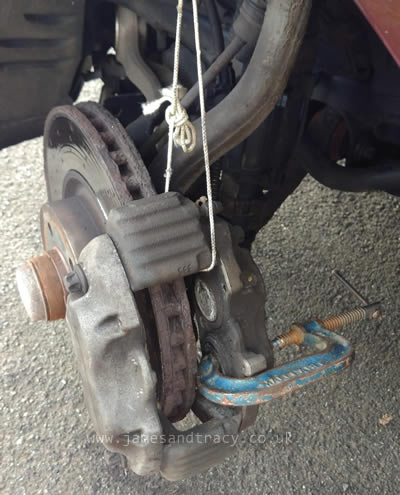 1. Assuming the caliper is stuck even partly out (they usually are) you need to find a sturdy G Clamp and a Penny Washer
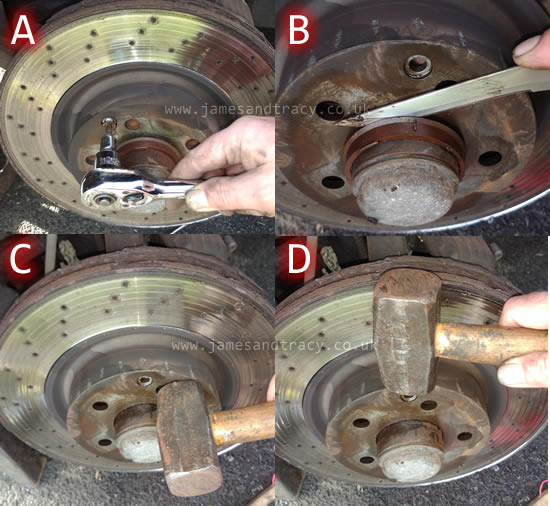
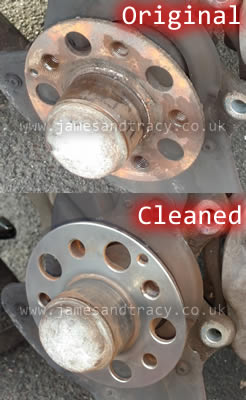 As previously said, most brake disc defects are caused (in my experience) by improper fitting - usually because the face of the spider (and hub) on which the new brake disc was fitted just wasn't fully cleaned. If this face isn't sparkling clean then the disc will not sit flat and ultimately may warp in use. You need to get this face absolutely sparkling clean, chipping away all hard rust flakes if there are any - you do not want anything other than a totally flat surface. Once you are happy follow the following procedure:
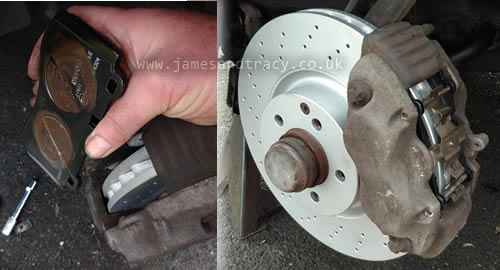
 The Triple Check is really important for safety so please make sure you complete it:
PLEASE SUPPORT US |
| If we helped save you money, please pay the favour forward and help support the upkeep of this site and its guides for others. Just click a button below. |
 |
 |
 |
| Big thanks from us for your help! |
Please share your knowledge. |
| Many people have already helped others through this site by contributing information and techniques. If you have something you want to contribute, please click here to contact us. You'll be credited on this site and you'll have shared what you know to help the community. |
| Thanks to all who have contributed |
 It is only your donations that keep this website going. If we've helped you, please pay the favour forward and help others by keeping this content alive. You can do this by clicking here and donating. Thank you, for whatever you decide to give.