

 It is only your donations that keep this website going. If we've helped you, please pay the favour forward and help others by keeping this content alive. You can do this by clicking here and donating. Thank you, for whatever you decide to give.
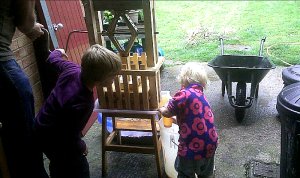 It is amazing how simple cider making is if you have a few simple pieces of equipment (click here to find out how to make a scratter and here for how to make a cider press). Whether you like your cider flat or fizzy, dry or sweet, you really are able to turn out very good cider very easily. It'll also give you that sense of achievement in that you will know that all the ingredients came from your garden. Don't be put off if you've unsuccessfully tried brewing beer, cider is far simpler and is easier to get right first time. My first ever batch was delicious!
- Cider is simple, it's more about the equipment than complex ingredients, but your mix of apples is important. If you find you have an uninteresting cider then try a different apple mix or add some tannin through crab apples or even a cup of tea!
- Apples
- Cider/Wine yeast (English cider) or Champagne yeast (European cider)
- The next ingredients are optional and will depend on the sort of cider you want to make - still or sparkling, sweet or dry.
- 1/4 by weight crab apples or a small cup of tea (Optional - not really necessary unless your first batch of cider tastes uninteresting)
- Pectinase (Optional - Pectic enzyme if you want a clear cider, but this does not affect the taste)
- Sucralose based sweetener (Optional - for sparkling sweet/medium ciders)
- Campden tablets (Optional - for still sweeter ciders made without sweetener)
- A little sugar for secondary fermentation or apple juice (Optional - for sparkling ciders only)
 It's all about the equipment, there are guides on this site to make some of these elements very quickly and simply:
- Demijohns (plastic or glass)
- Water/air locks for fermentation (cheap)
- Thermometer
- 2 x Buckets for collecting the pressed apple juice and scrat (mashed apples)
- Bleach (for washing and steralising the equipment)
- Bottles for bottling your cider, or a keg.
- Then the following that you can build yourself (see other guides):
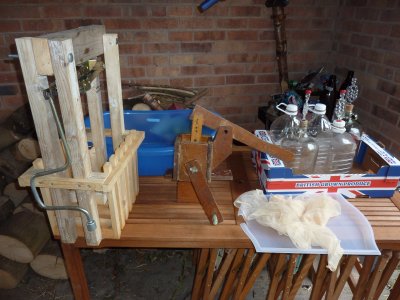
- Scratter for mashing the apples (click here for DIY plans)
- Cider press for extracting the juice (click here for DIY plans)
- This really couldn't be easier - so don't worry if you're not a cook!
 BEFORE YOU START: It is very important to steralise and clean the equipment you use to make cider. The wooden scratter and press that I use does not need steralisation, nor (if you have one made of wood) should yours. However you must clean these very carefully after use and then again before using them (I use a hose!). The bucket for collecting juice, the demijohns and anything you'll be using to stir or touch the juice with needs to be properly sterilised. The cheapest way to do this is with a dilute solution of household bleach. Just put bleach in your basin and fill it with water - then use this to wash each of your items. Before thoroughly cleaning off the dilute bleach with lots of fresh water, you need to leave an item on one cider for 10-15 mins so the bleach can kill all the bacteria. Do make sure that you thoroughly wash off the bleach before using your equipment. Anyway, on the the cider making process:
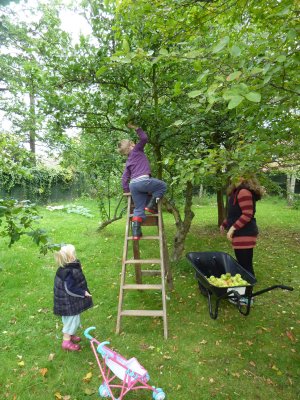
- 1. Pick or buy your apples. If you pick them leave them for 5-7 days before pressing to increase their flavour. Then wash them - wheelbarrows are good for this and a wheelbarrow full of apples will yield around 4 gallons (4 Demijohns) of cider.
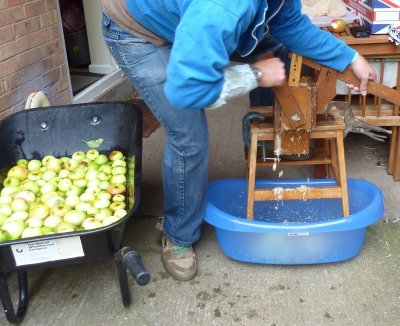
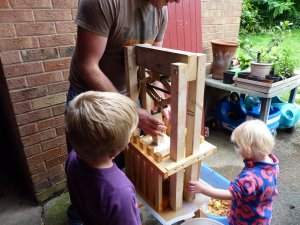
- 2. Now it's time to scrat (mash) the apples. There is no reason to build or buy an electric scratter unless you're planning on doing a lot of cider (more than 1 or 2 wheelbarrows). Hand scratters are hard work, but it's not that hard and they're quick. Plus they seem to deliver a better tasting cider - I have no idea why! Anyway, get on with scratting all the apples, do this on the same day you wish to press them, so leave yourself plenty of time. Collect the scrat in bucket or bowl. Yes it will look disgusting at this stage.
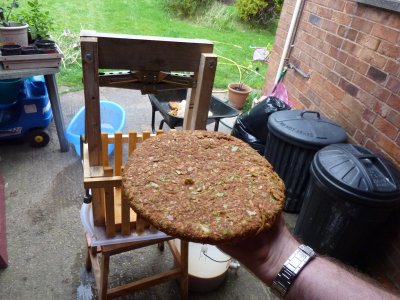
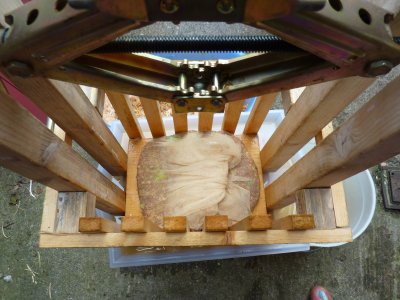
- 3. Now it's time to press your apple scrat to extract the juice. Beware as a small amount of scrat will release a massive tide of juice all at once, so be prepared. You need to make a 'cheese' of the scrat at the bottom of the press. The absolutely correct term for what you can see in the photo is not actually a 'cheese' but a 'hair', which is the scrat wrapped in a cloth. Normally there would be several 'hairs' placed on top of each other that together would make the 'cheese'. Between the 'hairs you place a plywood board with holes drilled in it so you can get an even pressing force. You can use more than one 'hair' if you like in your 'cheese', but personally I just use one 'hair' to make the 'cheese' and save all the bother. I use a net curtain off cut to do this - place the net curtain in the press, place some scrat in it, then wrap it up in the net curtain to form the cheese (see photo). Once you've done this you can start the pressing and watch the juice run out into your bucket. When no more juice runs out, remove the dry cheese and throw it into the compost. The repeat until you've got all the juice out of your pile of scrat. This apple juice tastes delicious, so sample it as though it looks very cloudy, it is really worth it!
- 4. Once you've finished pressing, add the apple juice to the demijohns - fill them as much as possible. Add the yeast starter - the yeast you bought will tell you how much starter needs to be in each demijohn (1 gallon or 40 pints). Also at this stage add your pectic enzyme (pectinase) if you want clear cider - again the pectinase will say how much to add. Finally put the air/water lock on the demijohns and move to one side in a place where they'll stay at around 18*C - 21*C until the air lock stops bubbling (about 14 days). This lack of bubbling will indicate that fermentation has stopped.
 5. Now fermentation has stopped it's time to get your cider to clear - move the demijohns to a cool place (not freezing!) until the cider goes crystal clear.
- 6. You're now onto the final stage once your cider is clear. It is at this point you need to decide what sort of cider you like - sparkling or still? Sweet or dry? The cider in the demijohns is dry still cider - if you taste this and like it then all you need to do is bottle it in sterilised (with bleach) bottles. If you prefer sparkling dry cider, then before bottling add 1/2 teaspoon or a very small amount of apple juice to each bottle before bottling your cider. If, however, you like sweeter cider, things are a little more tricky (but not much!). To get sweeter still cider your best option is to kill the yeast in the demijohns with campden tablets, before sweetening it with sugar. But your other option is to use a sucralose sweetener which cannot be 'eaten' by the yeast in the cider. Sucralose sweeteners are everywhere, but check that your sweetener really does contain sucralose and not aspartamine etc. as the others will impart poor flavour. For sweeter still cider just sweeten with sucralose to taste and then bottle. For sweeter sparkling cider, sweeten with sucralose to taste, then add 1/2 teaspoon of sugar (not sucralose!) to each bottle before bottling - the sugar will be eaten by the yeast to produce sparkling bubbles, but the sucralose will remain to give you the sweet taste you want.
- 7. That's it, put your cider bottles somewhere cool and waterproof (in case they explode!) for 3 months. Traditionally in England, these bottles of green cider are kept outside over winter and then in spring (as they warm up) the malic acid transformation takes place and you end up with a cracking cider around April/May. If you can't wait that long, don't worry, if you bottled in September, you'll have a great cider by December!

Traditionally made cider and scrumpy - what's better than that?
PLEASE SUPPORT US |
| If we helped save you money, please pay the favour forward and help support the upkeep of this site and its guides for others. Just click a button below. |
 |
 |
 |
| Big thanks from us for your help! |
Please share your knowledge. |
| Many people have already helped others through this site by contributing information and techniques. If you have something you want to contribute, please click here to contact us. You'll be credited on this site and you'll have shared what you know to help the community. |
| Thanks to all who have contributed |