Simple RC Night Flying Setup for the Beginner
How to set up your plane for quick and easy flying at night for less than £15


It is only your donations that keep this website going. If we've helped you, please pay the favour forward and help others by keeping this content alive. You can do this by clicking here and donating. Thank you, for whatever you decide to give.
- This guide describes a quick and simple way to set up your rc plane for night flying for less than £15. It does assume you already use 3S (11.1v) Lipo battery power for your rc aircraft or can modify your plane to take it. It shows you how to use cheap LED strips to form a pattern that will not disorientate or blind you at night and which is suitable for the first time night flier. It is primarily aimed at foam aircraft (depron, EPO or EPP), but the technique can be modified for open balsa frame and other crunchies. Night flying is fun, and if you choose the right setup is as easy as flying during the day - go on, extend your flying hours and give it a go!
-
-
 Recently a friend asked me if he could set up any of his radio control aircraft for flying at night or whether he'd have to buy a special night flying plane. I was a little surprised as it's easy to set up a plane for flying at night and I thought they'd be a lot of information on the web about it (the web is his usual source for everything!). Apparently not, he could find lots of forum posts, but he couldn't find a single guide targeted at the novice. So I decided to write this beginners guide to night flying, it basically shows you a simple night flying lighting scheme with LEDs and how to set up your plane to fly after dark.
 -
- Anyway, hopefully it'll help those of you out there who, like my mate, are thinking of giving it a go, but are not sure where to start or how much it will cost. All the parts shown here are easy to use and it should cost you less than £15 to get started if you already have a 3S lipo setup (and only a little more if you don't). Flying at night is no more difficult than flying in the daytime if you have the right setup, so why not give it a go? It extends you're flying time and you'll be amazed how many cars randomly stop to figure out what those weird lights in the sky are!
-
- There are some basic rules that you need to observe if you are going to be successful and not get frustrated when you try your first night-time flying session:
- 1. Orientation - Whatever light scheme you choose must let you orientate the plane easily from all angles (above, below, to the side and to the front or back). This is the single most important rule.
- 2. Colours - Keeping your night vision is very important. Choosing the right colour scheme will prevent you from becoming disorientated and blinded.
- 3. Plane - You can turn any aircraft into a pretty good night flying machine but some are more suitable than others.
- 4. Power - Lights draw power. Don't overdo them and choose a suitable power source. Keep it simple and safe to have more fun!
-
- 1. Orientation - What type of lighting or LED layout do I need for night flying?
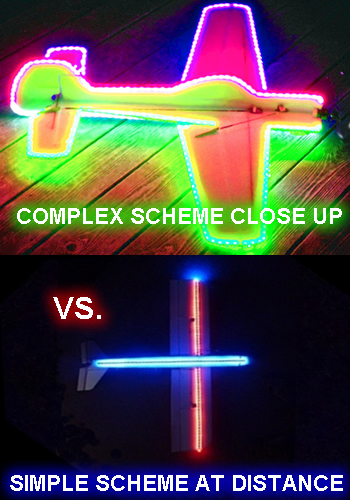 Keep it simple and asymmetric. Complex schemes look great (see photo to the left) but they can become very confusing at a distance once in the air unless you have loads of experience. Simple and clear asymmetry is key to ensuring you can tell both the orientation and attitude of the plane at a glance.
 -
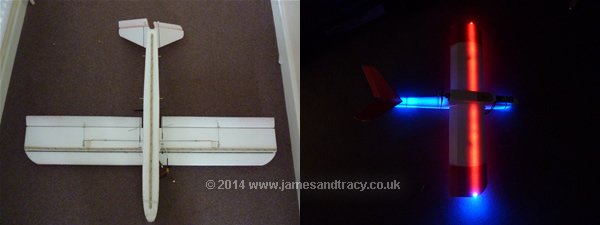
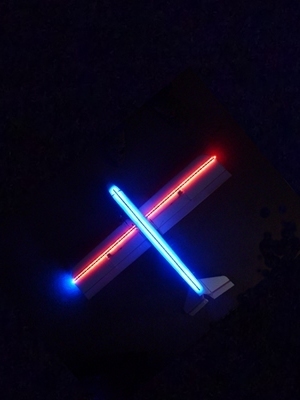
- What do I mean by asymmetry? Well have a look at the simple LED night flying scheme in the photo and then compare it to the more complex scheme - even at a distance the simple scheme is less disorientating. This is because the simple scheme has far fewer "lines" for your brain to interpret. In fact the simple scheme is just an asymmetric LED "cross" - it has a blue LED that lights the fuselage which is longer towards the tail than towards the nose (i.e. the red LEDs cross it more than halfway up) - of course, if the "cross" was perfectly symmetrical I would not know which end was the front! It also has bright blue and red lights at the wing tips to ensure I know which wing is which. Trust me, simple asymmetry is the key to success when you're starting out, I've lost a few planes at distance or during 3D due to losing orientation when I've employed more complex (but far more impressive!) schemes.
-
- Finally, if you are a beginner you may be tempted to try your first night flights at dusk, rather than in the full dark. Whatever you do DON'T! It seems counter intuitive but the most difficult time to fly at night is when there is some light around - moon lit nights, car headlights on nearby roads and dusk conditions are not your friends. You WILL become disorientated as you LED lights will not be as bright in the sky. If you are just starting out always pick a calm, fully dark night away from the bright lights of road traffic.
-
- 2. Lighting Colours - What are the best LED colours for night flying?
- Choose your colours carefully both for orientation and night vision.
 Keep the scheme simple and choose at least 2 colours. However, the more colours you have the more easy it is to become disorientated as there is more for your brain to interpret. If you are a beginner I'd recommend you stick to the basic 2 colour night flying scheme.
-
- Never underestimate how blinded you can become at night by even the smallest light source. Night vision is something you will need, so don't lose it by choosing the wrong colours. Some colours will out shine your other colours so much that you will not be able to orientate the plane at a distance or worse they will blind you at night close up as you are about to launch or land. Never ever choose white LEDs for this reason. The best colours for the beginner are red (this keeps your night vision) and green or blue (which do not blind you too much). Blue is perhaps the best compromise between retaining your night vision and having a light that is bright enough to locate the plane at a distance should you stretch your flying abilities just that little bit too far (red will fade first with distance, then green, then yellow, then blue and finally white). As a beginner I would therefore recommend a simple red and blue colour scheme if you are using the setup shown in this guide. Another top tip here is to point the LEDs into the plane (i.e. reverse the strip) if you have a unpainted foam aircraft - this will distribute the light around the airframe causing it to glow and preventing you being blinded by bright LEDs (see the setup at the end of this guide for more details on how to do this).
-
- 3. Plane - What type of RC plane do I need for night flying?
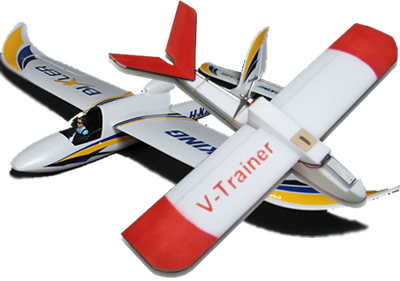 You can turn any aircraft into a pretty good night flying machine if it is powered, and I've even flown unpowered slope soarers at night. That said, if you are just starting out then a cheap electric foamy is just about perfect as you'll feel more confident flying it at night. You should look for something in the 1m to 1.5m wingspan category in EPP, Elapor or the equivalent (e.g. Bixler, V-Trainer etc.) and you should power it's motor with a 3s Lipo (11.1v) setup as this is very close to the power requirements for LED strip lighting. If you asked me for a recommendation and were looking to buy a plane specifically for night flying I'd say get a V-Trainer from FlyingWings as it's far, far tougher than others (e.g. the Bixler - yes, I own one of those too) and is perhaps the best multipurpose platform I have. The V-Trainer is suitable for loads of other things (e.g. sport flying, urban flying, photography and FPV) so is a worthwhile investment. However, if you already have a foamy or other suitable plane then there's really no need to buy another, just use what you've got.
 -
- 4. Power - How much battery power do I need for night flying?
- Lights draw power, you need to ensure the current draw is both safe and as low as possible in your night flying setup:
-
 (A) Use the minimal amount of lighting you can and use ultra-bright 12v LEDs as your light source. These are available in a 1m self-adhesive strip with all the necessary diodes already built in - just connect them up to a suitable power source and you're ready to go! These strips will run directly from a 11.1v 3s Lipo (which probably already powers your plane), are light and ridiculously cheap. You can buy them for less than £5 per meter if you import them from China or £8-£10 if you buy them from a local hardware store where they are sold as under-cabinet lighting for the kitchen. For something like the V-Trainer (1m wingspan) you will only need 2m of lighting LED strip (1m in one colour, 1m in another).
 -
- (B) Always draw power directly from the Lipo battery that powers your plane's motor if you can, do not use a "low voltage" battery saver and do not use a separate battery for your lights. I was out flying at night once when a fellow flier. turned up and, after the usual banter, we compared our LED light setups. He explained that for improved safety he was powering his lights from a dedicated lipo with a "battery saver" in-line to prevent the lipo cell voltage from dropping too low if he flew too long. As diplomatically as possible I asked him what he thought would happen when the battery saver cut in - it was at that point he realised he'd be left flying at night without any lights! The moral of this story is that your lights are your primary safety feature at night, so don't worry about your lipo's health - if you are flying without lights the least of your worries will be the health of your battery. However, there is an easy trick to get around this if you are running a 11.1v setup, just power the lights directly from your main motor battery - when your ESC's battery saver cuts in and reduces power to your motor, land immediately as your lipo is running low and the LEDs will continue to draw (a little) power from it until you unplug them on the ground. For this reason, most night flying rc planes use 3s (11.1v) power supplies for their motor/esc.
-
-
- This section describes a cheap and easy way to add LEDs to your foam rc plane for flying at night. It is particularly aimed at those pilots wanting to give flying at night a go with minimal cash outlay, but is suited to all skill levels. However, this set up does assume you are already using 3s lipo power (11.1v) for your aircraft or can modify your plane to take it - you can add LED lights to your plane using other voltages but you will need an voltage converter, inverter or separate power supply for them. This scheme uses the technique of inverting the LED strips (turning them upside down)to cause your airframe to glow, but bear in mind that the trick of using "inverted" strips will only work with unpainted white or light coloured foam aircraft. For simplicity, this scheme only employs simple 12v LED strips - nothing else. It uses the asymmetric. LED cross shown earlier in this guide as a design base and incorporates two bright LED lights at each wingtip to further help orientation at a distance (this is very important for a beginner who can easily let his aircraft get too far away at night). The scheme will work well and has been tested up to a distance of 200m at night and will probably work very well way beyond this distance, but 200m is plenty for night flying so I haven't bothered flying further!
-
- Tools and Equipment
- Assuming you already have a suitable electric RC aircraft of approximately 1m wingspan (e.g. V-Trainer or Bixler) with a motor/lipo combination installed, you will only need the following tools and equipment:
- - Very sharp hobby knife
- - Soldering iron and solder
- - UHU POR or a suitable flexible contact adhesive (beware of dissolving EPO foam planes!)
- - Blenderm tape (you can try to use other clear tapes but they will not work well)
- - 1 x 1m Blue LED 12v lighting strip (ultra bright - most are)
- - 1 x 1m Red LED 12v lighting strip (ultra bright - most are)
- - Servo wire, PC ribbon cable or other suitable thin electrical wiring
- - Electrical insulation tape or heat-shrink tube (you can even use Blenderm at a pinch)
- - 0.1 inch PCB header to connect to your Lipo battery (widely available at electronics stores e.g. Maplin)
-
- How to install the LED Lights for Night Flying
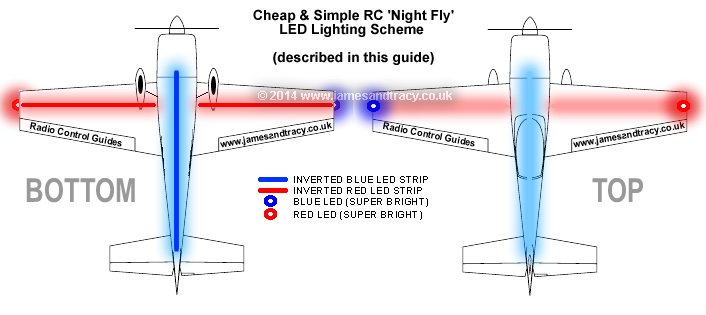 The diagram above shows you the simple lighting scheme for night flying that is covered in this section. Note that:
- - the trick of inverting the LED strips covered in this section will only work well with unpainted white or light coloured foam aircraft .
- - that you only need to install the LED light strips on the underside of your aircraft as you are going to be installing them "inverted" or upside down so they glow through the foam.
-
- Step 1: To follow this scheme your LED strips will probably need to be cut to length if your plane's wingspan is less than 2 meters as the strips come in 1 meter lengths. You cannot simply cut LED strips anywhere you feel like it, you must cut them at their assigned junction points. LED strips have these junction points marked along their length and this is the only place you can safely slice the strip to cut it to length. If you try to slice the strip anywhere else your LED strips will be useless
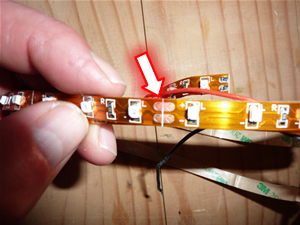 . You can recognise these junction points because they will have a white cut line stenciled across them. These junction points also have a secondary purpose as you can solder wires to any of them to power your entire LED strip. For this reason you will also find the bare copper terminals at the junction points marked +ve and -ve. It is important to note these polarities and solder wires appropriately - do not mix up your +ve and -ve as these are diodes your dealing with so getting the correct polarity from your battery is important! You won't break the LED strip if you get it wrong but nothing will light up. Anyway, once you have figured how you are going to route your LED strips you need to cut them to size at the nearest junction points and then mark their installation paths on your aircraft. In all cases make sure the LED strips on your wings stretch all the way (or as near as possible) to your wing tips but do not extend beyond them or curve round them as you need to leave room for your super bright LEDs.
-
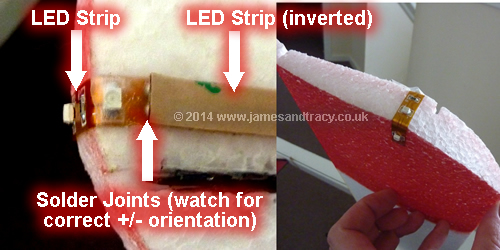 Step 2: It's now time to fabricate your super-bright LEDs for your wing tips. These are formed from spare LED strip using just a small single section between two LED strip junction points. Cut two of these strips from two different coloured LEDs - don't worry if one colour is the same as your main wing LED strips, just make sure the other is of a different colour (e.g. blue in the colour scheme diagram above). Now you simply solder these upside down to the main wing LED strips (see photo to the right above) making sure you get the polarities of the junction points correct (-ve to -ve, +ve to +ve). Once finished you should have 2 main wing LED strips that have been slightly extended with the two extra inverted LED strips. When you finally install the wing LED strips these extra inverted LED strips can be curved around your wing tip to give you ultra bright LED orientation lights at the tips.
-
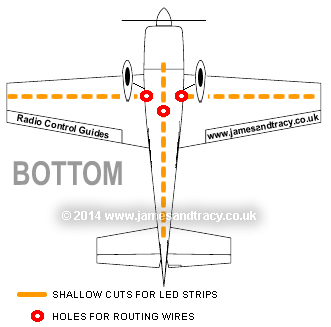 Step 3: Now, it's time to start preparing your airframe for installing the LED lighting. You need to make a shallow cut in your wings and fuselage along the installation paths of the LED strips (see the diagram to the right). These cuts are to house the LEDs which protrude from the strip. There's no need to cut a channel, just a 2mm deep slice in the foam's skin with a knife will do as the foam will flex around the LEDs. Also do not extend the installation cuts for the LED strips beyond the ends of the inverted LED strips as they could weaken your airframe. Installing the LEDs upside down (or "inverted") serves two purposes - firstly, you will not be blinded by the bright light from them at night, secondly they will case the foam fuselage to "glow" making your plane even more visible at night. However, this will only work for unpainted white or light coloured foam airframes - if you have a substantially painted or non-foam aircraft you will need to install the lights the proper way up and you do not need to make these shallow cuts. Finally, you need to figure out which junction points you will be using to power your LED strips and mark their corresponding points on the airframe before punching the holes for the power wires through to your lipo bay (again see diagram to the right for a suggested hole locations for your power wires).
 -
- Step 4: Next, with your airframe fully prepared, you need to solder the power lines to the LED strips and install them .
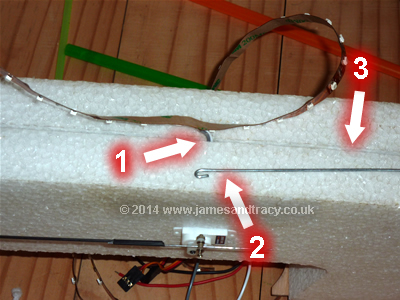 First solder the power wires to your LED strips at the appropriate junction points. Now, have a look at the photo to the right. This photo shows how to install a LED strip that is being powered at a junction point half way along its length: (1) first the wires are pushed into the hole that was punched through the fuselage; (2) then a hook is then used to pull the wires through the hole to the battery tray; (3) finally UHU or similar contact adhesive is applied to the LED side of the strip and the shallow cut in the fuselage before the LED strip is glued LED-side down into the channel. Do not remove the brown backing that protects the factory applied adhesive on the LED strips if you are installing them inverted. The exception to this rule is the end strips for the super-bright LEDs on your wingtips - as these are being installed the correct way round you can remove the brown backing from that section before sticking it down and curving it around your wing tip. That's it! Repeat the process until all your LED strips are installed.
-
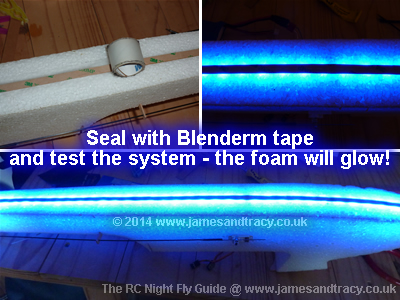 Step 5: The next thing you need to do is test the system before finally sealing it up. You can do this by stripping the ends of the wires and poking them into the power connector of your Lipo battery. Make sure it's a suitable voltage for your LED strip (for most LED strips at 12v a 11.1v 3s Lipo is fine) and remember to get the polarity right - if you don't get the polarity correct you won't damage your LED strip, but it will not light up. Finally, once you are satisfied that everything works as it should it's time to finalise your installation and seal all the inverted LED strips with Blenderm tape. Make sure you use Blenderm tape as it is the only available clear tape on the market that I have found that has the necessary tack, durability and flexibility. Despite Blenderm's high tack adhesive, I'd recommend giving it a bit of a helping hand on EPP by applying contact adhesive (like UHU) to the foam before smoothing it down. You really do need to cover any inverted LED strips in Blenderm to protect them and hold them in place so do not skip this step.
 -
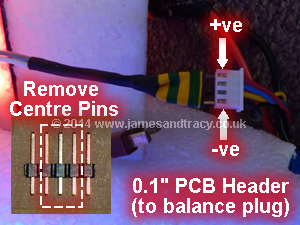 Step 6: The last thing to do now that you have tested your system is to make a proper connection to your LiPo. There are many ways to do this, but the way I favour is to take power directly from the Lipo battery's balance plug. Using some PCB header strip with a 0.1" pitch makes this an easy job as it is exactly the right size to make a male balance plug connector and is both cheap and widely available from computer and electronic shops (e.g. Maplin). See the photo to the right: you simply cut a length of header strip and remove the inner terminals with pliers (they pull out) and this leaves you with a plug that fits the two outside terminals of the balance plug which draw current from all the Lipo cells in you battery; then solder your LED strip power lines to the plug (remember to get the polarity right!) and plug it into your lipo - job done! It's simple, effective, does not interfere with any existing ESC/motor setup and is very lightweight. Once you've finished, carry out a final test on you night flying system, give yourself a pat on the back and then give it a go on a calm, dark night!